Showing posts with label basement. Show all posts

Saturday, September 17, 2011

One Step Forward, Two Steps Back

It turns out that having a baby cuts into blogging time!  Although we haven’t managed to update the blog in the past six months, we have managed to work on a few projects around the house. 

When we last left off, our subfloor was complete and we were anxiously awaiting the installation of our carpet and built-ins.  After the subfloor was laid, Dave painted the walls and finished the trim work.  Lowes installed our new carpet and our basement was finally ready for use!

IMG_0513

We found a couch from Ikea that would fit down our tiny stairwell (a common problem in many of the old houses in Toronto!)  We also installed the custom built-in cabinets we had ordered from the same person who designed our kitchen.  At this point, our basement was pretty much complete, aside from a few minor things that we decided to leave until the fall while we focussed on building a deck in the backyard. 

IMG_2094 (2)

All throughout our renovation, we always considered ourselves lucky that we never had any major setbacks.  Well, it seems that our luck had finally run out…

Shortly after we finished the basement, here is how it looked:

IMG_2132 (2)

Yep, that’s right.  Our beautiful, newly finished basement was all torn apart.

One morning, Dave flushed the basement toilet and it didn’t sound right.  He looked in the floor drain and noticed the water level was on the brink of flooding.  Luckily he caught it in time and we immediately stopped using water and called a plumber.  The plumber checked our drain pipes with a camera and discovered that an old clay pipe had shifted, causing a blockage. 

This is when we were really kicking ourselves.  Two years ago when we started our renovation, we replaced all the plumbing in our house, except for about 25 feet of old clay pipe under the basement floor.  At the time, it was a decision we made to save some money.  Obviously, we regret that decision now!

We could have fixed shifted pipe by just digging up a small section of the floor, however, we didn’t want to end up in this situation again down the road.

And so, the built-ins were removed, the carpet peeled back, the subfloor ripped out and the floor dug up.  The pipes were replaced, giving our house 100% new plumbing.  

IMG_2147 (2)

Now, we’re in the “rebuilding” phase.  The subfloor is back down and the carpet installers will be here next week to re-install the carpet.  Hopefully we can show a picture of completed room soon!

Friday, March 4, 2011

Basement Floors

Before the arrival of baby Logan, we got started on finishing the basement.  The first step was to deal with the floors.

In the laundry/utility room, we decided to paint the concrete floor to clean it up.  We used a concrete primer and paint to finish the floor.  This will brighten up the room and make it easier to clean.

Here’s the transformation:

IMG_0250IMG_0687

In the rest of the basement (the area that will become our family room) we plan to install carpet.  To prepare for the carpet, we needed to install subfloor.  Dave did some research and found a new product that has a half-inch profile which will save headroom. 

The product is called Tyroc.  The base of the subfloor panels are rubber, made from recycled tires.  The surface is magnesium oxide which is resistant to moisture and decay. 

IMG_0208

Although it was hard to find in Toronto, it was worth searching for.  It was relatively easy to install and, so far, we’re happy with it.  Here are the before and after shots:

IMG_0214IMG_0682

We’ve chosen our carpet from Lowes and will have it installed once the painting and trim is done.  Progress is much slower now that we have a baby who we’d rather spend our time with.  However, Dave is starting to find some time to work down there, so hopefully Logan’s play room will be ready soon!

Monday, February 21, 2011

Basement Interrupted

Finishing our basement has been an ongoing project over the past couple of months.  However, our work was interrupted on January 31 by the birth of our son, Logan! 

IMG_0534

We’ve been busy getting settled and enjoying our time with our new little man, but will be getting back to work soon.  Hopefully we’ll have some basement progress to share with you in the coming days.

IMG_0438

Thursday, June 24, 2010

The New Porch

We have a front porch again!  Once the porch was rebuilt with cinder blocks, it was finally time start making it look nice.

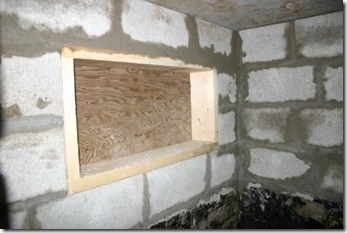
Inside the cold storage room, the walls were parged to leave a smooth surface.  Now it looks much cleaner and there isn’t anywhere for ants to live!  We also decided to get a window installed in the cold storage room, which will bring in some light and help us control the humidity during the summer.

IMG_4839

IMG_4894 IMG_4889 

Outside, we selected a faux stone to face the porch with.  We chose a greyish colour stone.

IMG_4845

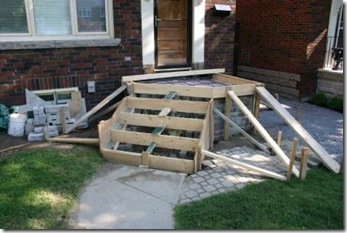
Once the stone was applied to the porch, the guys built the formwork for the concrete slab and stairs.  We decided to go with a bullnose on the stairs to dress it up a bit.

 IMG_4855IMG_4877 IMG_4875 IMG_4876 

Now all that’s left to do to finish the new porch is to choose and install a railing!

Friday, June 11, 2010

Porch Progress

Once the waterproofing was done and the trench was backfilled, the guys got to work replacing our old front porch.  You can see from the picture below how badly the brick was crumbling behind the stairs.

IMG_4770 

They tore down the old porch, leaving us with a nice big hole leading directing into our basement.

IMG_4779

IMG_4786

IMG_4784

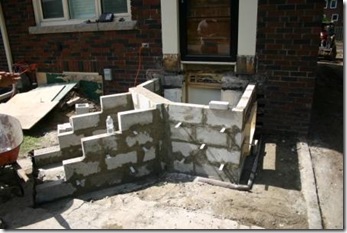
Finally, they rebuilt the porch with new cinder blocks, including a space for the new window.

IMG_4816IMG_4826IMG_4827   

The next step is parging the inside of the cold storage room and facing the new porch with faux stone.

Sunday, June 6, 2010

Not in the Plans

We’ve learned that it’s almost impossible to get through any major renovation without running into some unplanned, unexpected problems.  You may recall that our problems came in the form of ants in our cold storage room.

Our cold storage room is located in our basement, directly under the front porch.  We didn’t plan to do any work to it, since we intended to use it for storage.

20090718_1435

When we discovered an infestation of carpenter ants last summer, we decided to tear down the walls and ceiling to see how bad it was.  It was bad.

IMG_4702IMG_4747  IMG_4746

While tearing everything down to get rid of the ants that were living there, we could see that there was a moisture problem.   After getting the house sprayed for insects, we decided to leave the cold storage room unfinished for the winter and spring so that we could see if/how water was getting in.  When spring came, there were definitely signs of moisture and mould forming in that room. 

The exterior of the cold storage room (the front porch) showed signs of major deterioration when we bought the house.  We did some tuck pointing last summer to try and correct the problem, but moisture was still getting in.

Another issue was that the porch stairs were built without a footing, so over the years they had shifted and were falling away from the house.

The only real solution to all of these problems was to deal with our crumbling front porch.

20090706_1392 20090706_1391 

We called some experts to get some ideas and quotes.  Ultimately, we settled on the following plan:

  • dig up along the whole front of the house, including around the front porch, to waterproof below ground level from the outside.
  • tear down the porch to ground level and rebuild it completely.
  • add a window to the side of the porch, to allow for some ventilation in the cold storage room during humid summers.
  • build new concrete stairs with proper footing.
  • face the porch and stairs with faux stone.
  • parge the inside of the cold storage room.

It is a big project and not something that we had budgeted for.  But, in the end, we would rather have it done properly the first time.

New parging of exterior foundation walls:

IMG_4752

Sealant applied to foundation walls:

IMG_4757

Waterproofing membrane wrapping front of house:

IMG_4763 
Old clay weeping tile removed:

IMG_4755 

Now that the weeping tile has been replaced and the waterproofing is done, work is underway to rebuild the porch.  Hopefully we’ll finally have a functioning cold storage room this summer!

Thursday, March 18, 2010

Shower Glass

We were finally able to check another thing off our to-do list today, with the installation of the shower glass in our basement bathroom. 

As you may remember, we tiled the basement shower with travertine tiles and installed a matching beige marble threshold.  We decided to go with full glass walls and door, to keep the bathroom looking open and bright.  We selected a simple chrome handle and hinges to match the chrome faucets.

Shower Glass 2

Shower Handle 

Next, we’ll finish up the baseboards and trim.  Then we’ll be ready for the final reveal.  The best part will be having a fully functioning second bathroom in the house!

Wednesday, December 16, 2009

Basement Bathroom Progress

Once the tiling was finished in the basement bathroom, we shifted our focus to getting the rest of the house ready for us to move in. 

This week, we were able to spend some time working in the basement again.  We managed to complete the plumbing for the shower and install the vanity.

Originally, we thought we wanted a granite countertop for the vanity.  But, after spotting a glass counter and sink at Rona, we changed our minds. IMG_2602 IMG_2604

It turns out that the colour of the glass looks great with the walls, which we painted with Benjamin Moore’s Shaker Beige.  So far, we’re really happy with everything we selected for the bathroom.

IMG_2606

Now, all that’s left is to install the baseboards and order the glass for the shower walls and door.

Monday, November 2, 2009

Basement Bathroom Tiling

Our new basement bathroom is really coming along.  Since the main bathroom upstairs is pretty tiny, we decided to include a nice large shower in our basement bathroom.

Like upstairs, we used Schluter Kerdi waterproofing on the shower walls.  We used Schluter Ditra on the floor.

IMG_2367

The tiling was finished last week and it looks great.  We’re really happy with our choice of travertine tiles.

IMG_2428IMG_2432IMG_2430

Next , we’ll install glass walls and a glass door on the front of the shower. 

Wednesday, October 21, 2009

Basement Bathroom Plans

With tiling almost finished upstairs, we’ve made our final selections for the basement bathroom finishes.

The house only had one bathroom when we bought it, so we decided to add a second bathroom in the basement.  The basement bathroom will have a toilet, sink and shower.

IMG_2356

In terms of finishes, we selected travertine tiles for the floor and shower walls.  We’ll use 2” square tiles on the floor (both in and out of the shower) and 4” squares on the shower walls.

IMG_2377

We haven’t chosen the vanity yet, but we plan to get a 36” dark wood vanity with a beige granite top.  The toilet, as you may remember, was Dave’s selection: The Champion.

Thursday, September 10, 2009

We Passed!

In the past week, we had all our required inspections.  The City of Toronto came to do the structural, mechanical and plumbing rough-in inspection.  The ESA came to inspect the electrical work.  We passed them all!  It feels pretty good to have reached this milestone.

Once we passed the inspections, we got busy building the bulkheads in the basement and strapping the stairwell so that we can finally start closing things in.

Bulkhead

 Bulkhead and closet

shower bench

By the end of next week, we’ll have spray foam insulation applied and should be ready to start the drywall. 

Blog Widget by LinkWithin