Friday, June 11, 2010

Porch Progress

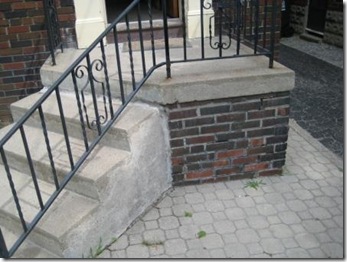
Once the waterproofing was done and the trench was backfilled, the guys got to work replacing our old front porch.  You can see from the picture below how badly the brick was crumbling behind the stairs.

IMG_4770 

They tore down the old porch, leaving us with a nice big hole leading directing into our basement.

IMG_4779

IMG_4786

IMG_4784

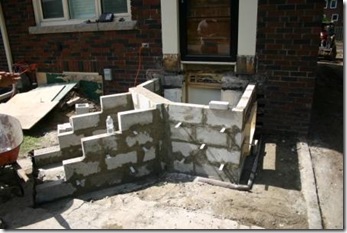
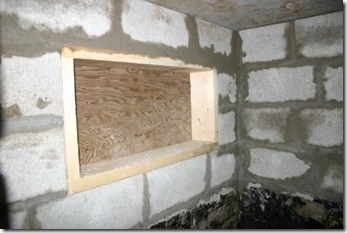
Finally, they rebuilt the porch with new cinder blocks, including a space for the new window.

IMG_4816IMG_4826IMG_4827   

The next step is parging the inside of the cold storage room and facing the new porch with faux stone.

Sunday, June 6, 2010

Not in the Plans

We’ve learned that it’s almost impossible to get through any major renovation without running into some unplanned, unexpected problems.  You may recall that our problems came in the form of ants in our cold storage room.

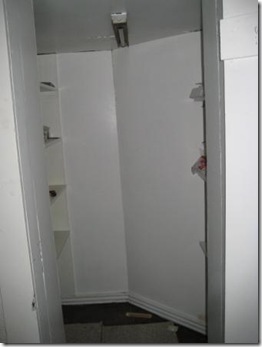
Our cold storage room is located in our basement, directly under the front porch.  We didn’t plan to do any work to it, since we intended to use it for storage.
20090718_1435

When we discovered an infestation of carpenter ants last summer, we decided to tear down the walls and ceiling to see how bad it was.  It was bad.

IMG_4702IMG_4747  IMG_4746

While tearing everything down to get rid of the ants that were living there, we could see that there was a moisture problem.   After getting the house sprayed for insects, we decided to leave the cold storage room unfinished for the winter and spring so that we could see if/how water was getting in.  When spring came, there were definitely signs of moisture and mould forming in that room. 

The exterior of the cold storage room (the front porch) showed signs of major deterioration when we bought the house.  We did some tuck pointing last summer to try and correct the problem, but moisture was still getting in.

Another issue was that the porch stairs were built without a footing, so over the years they had shifted and were falling away from the house.

The only real solution to all of these problems was to deal with our crumbling front porch.

20090706_1392 20090706_1391 

We called some experts to get some ideas and quotes.  Ultimately, we settled on the following plan:

  • dig up along the whole front of the house, including around the front porch, to waterproof below ground level from the outside.
  • tear down the porch to ground level and rebuild it completely.
  • add a window to the side of the porch, to allow for some ventilation in the cold storage room during humid summers.
  • build new concrete stairs with proper footing.
  • face the porch and stairs with faux stone.
  • parge the inside of the cold storage room.

It is a big project and not something that we had budgeted for.  But, in the end, we would rather have it done properly the first time.

New parging of exterior foundation walls:

IMG_4752

Sealant applied to foundation walls:

IMG_4757

Waterproofing membrane wrapping front of house:

IMG_4763 
Old clay weeping tile removed:

IMG_4755 

Now that the weeping tile has been replaced and the waterproofing is done, work is underway to rebuild the porch.  Hopefully we’ll finally have a functioning cold storage room this summer!

Wednesday, June 2, 2010

Living and Dining Room: Before and After

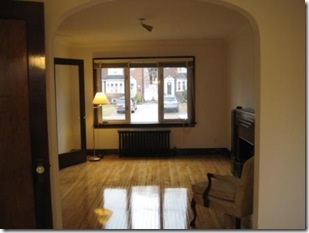
The one thing that kept our main floor from feeling complete for the last few months was the lack of a dining room table.  Once we found our table, the space was pretty much done.

The main design changes to the living and dining rooms include:

  • removing the archway
  • installing pot lights
  • adding the sliding door walkout to the backyard
  • installing new hardwood floor throughout the main floor
  • adding shutters to the living room windows.

Before:

 Looking towards the front hall from the living room:20090329_0998

 Looking at the living room from the dining room:20090329_0995

Looking into the dining room from the living room:20090329_0994 
After:

IMG_4632IMG_2938IMG_2934

We spent a lot of time looking for a dining room table that would be narrow enough to fit our space, but extendable so that we could seat a larger number of people.  The table search was harder than we expected.  After a couple of months of searching, a neighbour suggested we try Decorium, where we found a table that we were able to customize to fit our space and our style.

In the living room, we chose to get our old couch reupholstered and we were able to use most of our other living room furniture.  We painted the entire main floor, including the living room and dining room, Benjamin Moore’s Ballet White.  We’re still looking for some art for above the couch, which we hope will bring some colour into the space.

One of the biggest changes to the dining room was the fact that we removed the wall between the kitchen and the dining room, opening up the space.  We’ll share the final kitchen photos in a separate post.

Friday, May 28, 2010

Master Bedroom: Before and After

The bedrooms didn’t require many changes.  In the master bedroom, we increased the size of the closet by taking some space from the second bedroom closet.  We installed shutters in the windows, purchased a new light fixture and painted the walls Benjamin Moore’s Athabaska.

Before:

20090329_0981

After:

IMG_4650

IMG_2886  IMG_4649

Tuesday, May 25, 2010

Upstairs Bathroom: Before and After

The upstairs bathroom (which was the only bathroom) was in pretty good shape for being fully original.  While we chose to redo the bathroom, we ended up going with a similar look and colour scheme. 

Before:

20090329_098320090329_0984


After:

IMG_4644 IMG_4643 IMG_2945

We tiled the walls in the shower area with white ceramic subway tiles with a 3” insert of grey glass mosaic tiles.  On the floor, we used 2” hexagon white carrara marble.

We kept the original cast iron tub and had it refinished.  We replaced the toilet with a Toto Aquia dual flush toilet, painted the walls with Benjamin Moore’s Sweet Innocence, and added a new vanity and mirror.

Saturday, May 15, 2010

Stairs: Before and After

To update the look of the stairs, we decided to re-stain the stair treads and banister in the same colour we stained the upstairs hardwood floors.  We chose to paint to the risers and spindles white.

Before:

20090329_0986 20090329_0985

After:

IMG_4652 IMG_4639

IMG_2951 IMG_2942

The original walls in the hallway and stairwell were stucco.  We replaced them with new drywall, which really helped make the space look more modern.  We hung some coat hooks at the bottom of the stairs and added a small bench where we can store some shoes.

Tuesday, May 11, 2010

The Exterior: Before and After

First up for the final reveal is the front of the house. 

While we loved the style of the house and the colour of the brick, we did not love the green paint around the front door.  We dealt with it for a few months while we focused on more important things, but it was definitely a happy day when the green was gone!

Other work on the front of the house included changing the house numbers, adding a mailbox, replacing the porch light with a pot light and installing a new storm door.

Before:

20090329_0999

20090329_1001

After:

IMG_4589 

IMG_4586

Revealing the Rooms

Although it’s been a year since we started renovating our house – and five months since we moved in – we’ve only recently started to feel like some rooms are complete.

We’ve learned that, once the major work is done, it’s easy to move on with your life without completing the smaller projects.  It’s some of these little projects that have kept us from revealing our completed rooms to everyone.

As any homeowner knows, a house is never 100% complete.  But now, as we shift our focus to dealing with the backyard, it’s time to consider most of our house complete. 

And, with that, we’ll begin to share the before and after shots with you.

Saturday, May 8, 2010

Stumped

Before we got started on the backyard, there were some old, prickly bushes growing through the fence behind the garage.  Since we will be building a new fence along this side of the yard, we needed to clear the area.  We cut down the bushes and removed the old fence before demolishing the garage.  This left us with a bunch of stumps to deal with. 

IMG_2896 
The stump removal job called for a serious piece of machinery! 

IMG_4660

IMG_4665 

With a rented stump grinder and a couple of hours of work, the stumps were shredded and the back of the yard was nice and flat…

IMG_4687

Saturday, April 24, 2010

No More Eyesore!

This week, we tackled the garage demolition.   Like last year when we gutted the inside of our house, Dave gathered a group of friends to help.

We lucked out with a nice, sunny day.  A little bit of muscle, two dumpsters and several beers later, the garage was gone!

IMG_2915IMG_2917IMG_2920  

For now, we’re left with the concrete pads that were beneath the garage. It certainly opens up the space and allows us to get a good feel for how we want to layout our yard.  Thanks to Jim, Rob, Dave, Chris, Guy, Becca and Ron for all your help!

Here’s the transformation:

20090329_1002

IMG_2927 

Next up: breaking up the concrete and installing the fence posts.

Tuesday, April 20, 2010

The Great Outdoors

When we got started on our home renovation this time last year, we knew that most of the yard work would have to wait.  Since we weren’t living here, a nice backyard just wasn’t a priority.

You may remember that our backyard is narrow and deep.  Last summer we put in some cedars along the back fence line and removed the old wire fence along one side of the yard.  Other than that, we pretty much left things as is back there.

Now that we’re heading into our first summer in the house, we’re ready to start focusing on the backyard.  Deciding what to do, however, was a bit of challenge.

The garage (which is a double garage that we share with our neighbour) is in pretty rough shape.  Since the garage is at the end of a very narrow mutual driveway, we don’t use it for parking.  After discussions with our neighbour, we decided that we’d rather tear down the garage and replace the storage space with garden sheds at the back of our properties. 

20090329_100220090329_0976

We did some research and discovered that the municipal bylaw requires that we each maintain one parking space behind our house.  Currently, the garage meets that requirement.  So, to allow us to remove the garage but still meet the requirements, here’s the backyard plan we came up with:

  • Remove the existing wire fence, bushes and stumps behind the garage.
  • Tear down the garage.
  • Create two parking spaces with interlock in the place of the existing garage (which we will actually use as patios).
  • Put up a fence between the parking spaces and all along that side of the yard for privacy.
  • Replace the asphalt on the mutual driveway.
  • Build a garden shed in the back corner of the yard.
  • Build a deck that will step down onto the interlock patio area, increasing our outdoor living space.

It’s a bit of an ambitious plan that will not get fully completed this summer, but will definitely make our backyard a lot more attractive and functional. 

We started the work last week, ripping down the old fence and ordering a storage container to hold our lawnmower, etc. while the garage gets demolished. 

 IMG_2901 IMG_2903

This week, the garage comes down!

Blog Widget by LinkWithin