Saturday, March 27, 2010

Kind of a Big Deal

One of big reasons why we were so ready to move from a condo to a house was the fact that we had never owned a BBQ! Our condo building didn’t allow BBQs on the balconies, nor did they have a communal BBQ area.

Exactly one year ago this weekend, we found and purchased our first home…a house with a backyard that would be perfect for BBQing! Marty (Jen’s Dad) said that, when we were ready, he would buy us one as our housewarming gift.

Once spring arrived and most of the interior renovation was complete, we were ready. With or without a deck, it was time for the BBQ.

We hooked it up to our natural gas line, seasoned the grills and prepared our first meal. What a great way to celebrate Earth Hour!

IMG_2851 IMG_2856

We’re looking forward to getting a lot of use out of our new BBQ this summer. Thanks Marty!

Thursday, March 18, 2010

Shower Glass

We were finally able to check another thing off our to-do list today, with the installation of the shower glass in our basement bathroom. 

As you may remember, we tiled the basement shower with travertine tiles and installed a matching beige marble threshold.  We decided to go with full glass walls and door, to keep the bathroom looking open and bright.  We selected a simple chrome handle and hinges to match the chrome faucets.

Shower Glass 2

Shower Handle 

Next, we’ll finish up the baseboards and trim.  Then we’ll be ready for the final reveal.  The best part will be having a fully functioning second bathroom in the house!

Sunday, March 7, 2010

Clean Start

After dealing with the fiasco that was our first dishwasher, we’ve finally had a chance to test out our replacement dishwasher.

The new dishwasher we chose is the Bosch Integra.  Some of the key features include:

  • stainless steel exterior and interior
  • tall tub
  • delay start
  • concealed control panel.

The most important thing about this dishwasher is that the steam vents properly during the dry cycle, so we no longer have to deal with the condensation issues that we had with the Frigidaire. 

A big treat with the Bosch is how quiet it is.  We’ve always used the “delay start” feature on dishwashers because we couldn’t hear the TV over the sound of the dishwasher.  No need anymore!  The Bosch is extremely quiet.  We can hardly tell that it’s running.

The Bosch is also very sleek looking, with no controls showing on the front.  And, there’s a cool little LED light that shines onto the floor to let you know that the dishwasher is running.

IMG_2819

Finally, the dishes come out clean and dry, so no issues there.

All in all, we’re really happy with the Bosch.  If we had known about the Frigidaire problem months ago, we would have saved ourselves some trouble and spent the extra money to get this better dishwasher right from the start.  We would definitely recommend it to anyone who is looking for a good, stainless steel dishwasher.

Sunday, February 28, 2010

Dishwasher Debacle

In order finalize our kitchen design back in the spring, we needed to order all our new appliances.  As you may remember, we settled on Frigidaire for our fridge, range and dishwasher. 

The stainless steel appliances looked nice and sleek.  And, they seemed to be the best for not showing fingerprints.

IMG_2818

Sadly, we learned pretty quickly that we had made a mistake by selecting the Frigidaire dishwasher.  Had we done a bit more research in advance, we would have discovered the major design flaw that makes this dishwasher so bad. 

Most dishwashers have small vents at the top or bottom that allow the steam to escape when the dishwasher is in the dry cycle.  The Frigidaire dishwasher does not.  This means that the steam is forced out the sides of the dishwasher door, causing condensation to build up on the kitchen cabinets beside the dishwasher.  The condensation drips down the cabinet doors to the floor.

After less than a month of use, the condensation already started to damage our brand new kitchen by causing the paint to peel on the cupboards! 

IMG_2713

Once we discovered the problem, we did some searching on the internet and found that we weren’t the only people to have these issues.  There were even entire blogs dedicated to it!

We knew we couldn’t keep using a dishwasher that was going to damage our cupboards and floors, so we began the long and tedious process of getting it replaced.

We started by calling Frigidaire, but had no luck even getting them to answer the phone.

Next, we moved on to the Brick – where we purchased all our appliances – and called the salesperson who we originally dealt with.  He told us we needed to call the Brick’s warranty department, who would send someone out to service the dishwasher. 

After the first service visit, we were told that the dishwasher was installed incorrectly.  We repositioned it, tried again, and continued to have the same problem. 

We called the Brick again for another service visit (even though we knew the dishwasher wasn’t actually broken or installed incorrectly – just poorly designed!) and this time the service technician could clearly see that the condensation was causing steam damage to the surrounding cabinets.

After numerous phone calls and weeks of waiting, the Brick finally agreed to provide us with a store credit so that we could replace the dishwasher with a new one of our choice. 

In the meantime, we made sure we protected our cabinets and floor while we continued to use the dishwasher.  Our set-up looked ridiculous, but was the best we could do!

IMG_2675

This time, we made sure to do lots of research before settling on a new Bosch dishwasher:

MCSA034248_SHX31M05UC_def

While more expensive than the Frigidaire, the Bosch gets excellent reviews and still has the clean, sleek look we want.  The Bosch arrived today, but we haven’t had a chance to install it yet because we were busy watching Canada win the gold medal hockey game!  We’ll post a review of our new dishwasher once we’ve had a chance to use it.

Monday, February 15, 2010

Trim and Touch Ups

It’s been pretty quiet over here because we’ve spent the last few weeks doing some less-than-exciting work around the house.  Without any major deadlines, everything seems to take a whole lot longer.

After moving in, a big pile of baseboards sat in our living/dining room while we were busy with other priorities.  But, with the kitchen finished and most of our stuff unpacked, we knew it was time to get moving on the rest of the trim work.

Using the saw outside is a little less fun this time of year, but Dave braved the wind chill to get it done.

IMG_2650

IMG_2646

Once all the trim was installed, caulked and painted, we turned our attention to patching up the nicks and gouges in the walls. As careful as we were, bumping the walls was inevitable!

IMG_2688

This seemingly minor trim work takes a huge amount of time.  And while it isn’t the type of work that people tend to notice – unlike a new kitchen, bathroom tiles or hardwood floors – it does make our house look complete.

So, that’s what we’ve been up to over here.

Tuesday, January 26, 2010

The Granite Test

You may have noticed that things have been pretty quiet around here.  While we still have a nice long list of projects to tackle around the house, we’ve been struggling to motivate ourselves to get back to work after the holidays.  So, instead of painting/caulking/unpacking, we spent some time in the kitchen.

To make sure we knew how to care for our kitchen countertops properly, we did a lot of reading.  We kept seeing information about the importance of sealing granite to ensure that it doesn’t get stained.  When our granite countertops were first installed, the installers applied a coat of sealer.

Of course, even though we knew our granite was protected, we couldn’t help but worry about spilling things on it.  Who wants to wreck their brand new countertops?

Will the sealer really protect the granite?  Do we really need sealer at all?  What sort of things stain granite?

To ease our minds, we decided to do some tests on our sample piece of Giallo Ornamentale granite.  We divided the piece in half and applied sealer to one side.

IMG_2669

IMG_2667

Once the sealer was dry (we let it dry overnight) we used Dave’s favourite Christmas present to label the sides.

Before

Our (highly scientific) method for testing our granite was as follows:

  • Select a substance and pour a bit on each side of the piece of granite.  Take a picture.
  • Wait 30 minutes.  (We figured that we were pretty unlikely to leave a spill on our counters for longer than that.)
  • Remove the substance with paper towel and take another picture.

Test #1 – Water
We decided to start with water because we had noticed some dark splotches on our counters when we spilled water.  We knew that the marks disappeared once the water evaporated, but we thought we try and see if there was any difference between sealed and unsealed granite. 

Water

Water 30 Mins

Water Test Results: When the water was first poured on the unsealed side, it looked a bit darker.  But, in the end, there was no difference.


Test #2 – Olive Oil
After the water, we were ready to move on to the more fun stuff.  We decided to try something greasy, so we brought out the olive oil.
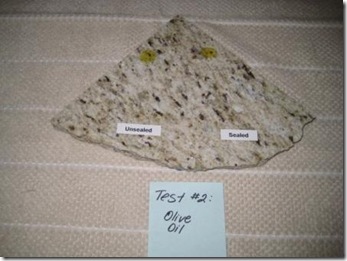
OilOil 30 Mins 

Olive Oil Test Results: There was not much difference between the sealed and unsealed sides.  If anything, the stain may have been a bit darker after 30 minutes on the sealed side, but that could have just been the colour variation in the granite.


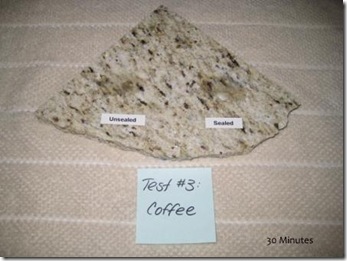
Test #3 – Coffee
Next, we thought that maybe something dark and hot would do some sort of damage to the granite.  Bring on the coffee.

CoffeeCoffee 30 Mins  

Coffee Test Results: Still no difference.  The coffee left wet marks on both the sealed and unsealed sides, which eventually evaporated and left no visible stain behind.


Test #4: Orange Juice
With coffee and oil appearing not to have any affect on our counters, it was time to try something  really dangerous!  We’ve read that acidic substances can damage natural stone, so let’s see what orange juice does to our sample.

 OJ OJ 30 Mins 
Orange Juice Test Results: Just like the coffee and the water, the orange juice left dark patches until it evaporated.  But, after it dried, we noticed that the texture of the granite was a bit different.  The spots where the orange juice had been were rougher.  This roughness was more noticeable on the unsealed side.  We were worried that the acid in the juice had damaged the surface of the granite, however, after wiping it with a damp cloth, we were able to get both sides nice and smooth again.


Test #5 – Red Wine
So far, our granite seemed to be holding up pretty well to our spills.  For our final test, we brought out the red wine.  We’ve already experienced a couple of instances where we were afraid to set an open bottle of wine on the counter because we worried that the wine would drip down the bottle and stain the counter.  Time to see if we really need to be worried!

Wine Wine 30 Mins Cleaned

Red Wine Test Results:  Not as bad as we expected, but the red wine did leave a faint pink tinge on both the sealed and unsealed sides. Given that our granite has some reddish-brown flecks in it, a small drip would probably go unnoticed if wiped up after 30 minutes.

Since the granite held up so well through all our tests, we thought we’d try the red wine one more time.  This time, we left it overnight.

Wine OvernightWine Overnight Cleaned

After approximately 12 hours we saw some real staining.  After rinsing off the sticky residue left behind by the wine, we were still left with some pretty dark stains on both sides of the granite. 

Granite Test Conclusions
So, what we’ve learned from our little test is that we seem to have chosen a pretty good type of granite for kitchen use.  The colour variation hides any darkening that comes from little spills.  Obviously we don’t plan to leave any spills on the countertops that could potentially damage them, but spills happen.  If we wipe them up fairly quickly, we shouldn’t have any problems. 

Whether it makes a difference to use sealer was pretty inconclusive, but we figure it can’t hurt to keep our granite protected. 

Have any of you found that something stained or damaged your granite countertops?  Or is there something that you’d like us to test?  Let us know!

Monday, January 11, 2010

The Final Inspection

In May 2009, with lots of excitement, we hung our fresh building permits in the windows of our new house.  We had all our plans and were ready to get started on our renovation adventure.

Today, almost 7 1/2 months later, we passed our final building inspection!

It is with just as much excitement (but with a little less energy!) that we removed the permits from our front window.  No longer does our house look like a construction site! 

While we still have lots of projects to tackle this year, it certainly feels good to know that we’ve achieved another major milestone in our renovation.

IMG_2681

Wednesday, January 6, 2010

Media Hub

Before the drywall was installed back in September, we decided to wire every room for phone, cable and internet.  Since all the walls were open, it was a fairly easy thing to do.  What we were left with, however, was a big mess of wires in our utility room.

IMG_1990

IMG_1991

IMG_2653

To try and organize things, we decided to create a media hub below our electrical panel.  We purchased a small structured media box that we could feed (and hide) the phone and cable wires into.

IMG_2656 

With the new label maker that Dave got for Christmas, we labeled the ends of all the wires before connecting them. 

IMG_2658 IMG_2661 IMG_2663

We built a little shelf above the box to hold the modem and mounted a power bar on the wall.  Now we have a nice, neat area where all our phone, cable and internet wires are connected.

IMG_2662

Sunday, January 3, 2010

Looking Forward

2010 shouldn’t be quite as stressful as 2009, but that doesn’t mean that all our work is done.  We still have a long list of projects that we plan to work our way through this year:

  1. Finish installing trim on the main floor.
  2. Finish caulking and painting all trim.
  3. Stack the washer and dryer.
  4. Hook up the phone connections.
  5. Finish all the data wiring (internet, cable, etc.)
  6. Apply for a permit for a front parking pad.
  7. Paint interior doors.
  8. Order glass for basement shower.
  9. Install kitchen backsplash.
  10. Deal with the garage.
  11. Build a fence in the backyard.
  12. Landscape the front garden.
  13. Build a deck.
  14. Refinish the front door.
  15. Install closet systems in the bedrooms.
  16. Purchase a dining room table and chairs.
  17. Figure out storage/display solution for living room.
  18. Hang artwork.
  19. Purchase a dining room chandelier.
  20. Finish cold storage room.

As you can see, there is still a lot of work to complete.  We may not get to everything, but we’ll do our best.

Not wanting to waste any time, we got straight to work on New Year’s Day, stacking our new washer and dryer.  They’re pretty large and a bit overwhelming in the space, but at least we gain some more floor space in our utility room by stacking them.

IMG_2654

So far 2010 is off to a pretty good start.  We’ll post a little later this week about the other project we’ve tackled since the start of the new year – dealing with the phone, cable and internet wires.

Thursday, December 31, 2009

Looking Back

2009 was certainly a big year for us.  On the eve of 2010, we thought we’d look back at some of the highlights, lowlights and most memorable moments from our renovation:

Highlights

  • Purchasing our first home (obviously!)  Remember how happy and well-rested we were when we first got the keys?

20090429_1022

  • Completing our new kitchen, which (once finally finished) turned out even better than we had hoped.
  • Getting so much help from all our friends and family.  This definitely helped keep us sane and allowed us to get things done so much faster. 
  • Making the front of the house a little more appealing.
  • Finishing the demolition in one day!

20090611_1227

Lowlights

  • Discovering carpenter ants in the cold storage room. Ew!
  • When the only functioning bathroom had no walls.20090803_1482
  • Moving in without a finished kitchen.  That last month of eating fast food was the hardest one of all!
  • When the City of Toronto workers were on strike.  Waiting for the building inspector to go back to work caused some delays.

And, as with any renovation, there were the projects that didn’t go quite as planned and the embarrassing pictures that didn’t get shared the first time around:

  • Like working in the attic…

20090803_1477 IMG_2195

  • And installing the vapour barrier when we were tired, grumpy and frustrated.  We called this the “corner of shame.” It was NOT one of our finer moments…

IMG_2202

But all in all, it’s been a pretty great year.  Even with the ups and downs of spending most of 2009 in the midst of a major renovation, we consider ourselves extremely lucky. 

So, as we sip our Veuve and celebrate another year, we look forward to a new year with our beautiful home, wonderful family and great friends.  Happy New Year everyone!

Cheers 2

Thursday, December 24, 2009

A Kitchen for Christmas

Our kitchen received an early Christmas present: our granite countertops were installed this past weekend!

We visited a number of stone places around the city and ended up going with Pro Stone, which we found on Home Stars.  Pro Stone handled both the fabrication and installation of the granite. The granite we selected is called Giallo Ornamentale.

giallo_ornamental

The installation took a couple of hours.  Once the counters were in, we had to wait 24 hours before we could install the kitchen faucet.  Then we hooked up the stove and dishwasher. 

IMG_2611 IMG_2620

Finally, we put together our new Ingolf stools from IKEA. 

IMG_2621

The colour of the granite looks great with our white cabinets and the wall colour (Benjamin Moore’s Ballet White).  All in all, we’re thrilled with the look of our new kitchen.

  IMG_2623 IMG_2628

IMG_2643

Over the holidays, we’ll spend some time finding a permanent home for our small appliances.

We feel really lucky that, even with the Christmas rush, were able to get our counters installed before the holidays.  Having full use of our kitchen (and not having to see the pizza delivery guy every night!) will really help make our house feel like home.

Blog Widget by LinkWithin