Monday, February 21, 2011

Basement Interrupted

Finishing our basement has been an ongoing project over the past couple of months.  However, our work was interrupted on January 31 by the birth of our son, Logan! 

IMG_0534

We’ve been busy getting settled and enjoying our time with our new little man, but will be getting back to work soon.  Hopefully we’ll have some basement progress to share with you in the coming days.

IMG_0438

Friday, January 21, 2011

The Nursery

As we mentioned back in November, we’ll be welcoming our baby boy in the next few weeks.  To prepare for his arrival, we’ve been busy working on a few key projects.

Of course, the most important project (or at least the first priority) was finishing the nursery.

Nursery 4

We decided to use the smallest of the three bedrooms for the nursery.  It’s a pretty small space, but we’ve managed to make it work.

We painted the walls a pale aqua (Benjamin Moore’s Icing on the Cake).  The curtains and crib bedding are Sweet Kyla.  The crib and dresser are by DaVinci, ordered from CSN Baby.  Our Dutailier glider was passed on to us by our generous neighbours who no longer needed it… what a treat!

Our goal with the nursery was to create a room with some fun colours, without using a really boyish theme.  We’re really happy with how it looks so far and hopefully our little guy will like it too!

Nursery 5The only thing left to do is get some artwork for the walls.  We think we’d like to incorporate his name into the art, so we’ll wait until he arrives to choose something.

Tuesday, November 23, 2010

Checking in on the To-Do List

It’s been one year since we moved into our house, so we thought it might be a good time to check in on the status of our projects.  After moving in and getting settled, we put together our to-do list – a list of the projects we hoped to tackle (or at least begin to tackle) in 2010.

Let’s see how we’ve done:

Green – Project is underway but there are a few obstacles.
Red – Project is not a priority and we decided to put it on hold.
Black – Project is completed.

  1. Finish installing trim on the main floor.
  2. Finish caulking and painting all trim.
  3. Stack the washer and dryer.
  4. Hook up the phone connections.
  5. Finish all the data wiring (internet, cable, etc.)
  6. Apply for a permit for a front parking pad.
  7. Paint interior doors.
  8. Order glass for basement shower.
  9. Install kitchen backsplash.
  10. Deal with the garage.
  11. Build a fence in the backyard.
  12. Landscape the front garden.
  13. Build a deck.
  14. Refinish the front door.
  15. Install closet systems in the bedrooms.
  16. Purchase a dining room table and chairs.
  17. Figure out storage/display solution for living room.
  18. Hang artwork.
  19. Purchase a dining room chandelier.
  20. Finish cold storage room.

While we’ve managed to complete quite a few things, we’ve decided to leave some of the projects for next year.  Of course, along the way, we also ended up adding a bunch of new projects to the list (which we also managed to complete!):

  • Tear down and rebuild the front porch.
  • Purchase and install the air conditioner.
  • Waterproof the front of the house.
  • Replace the eavestroughs.
  • Install a carpet runner on the stairs.

As mentioned in a previous post, with a baby on the way, we’ve shifted gears and are working our way through a new, shorter list of projects.  After we finish those projects and get settled with our new family member, we plan to get back to work on the projects listed above!

Wednesday, November 10, 2010

Stair Runner

No more slippery stairs!  We finally got around to purchasing a carpet runner for our stairs.

A few months ago, we showed you our refinished stairs.  While we loved the way they looked, we knew that adding a runner would help us avoid slipping and falling.

IMG_0150

So, we went ahead an ordered some berber carpet from Lowes.  It took a couple of weeks after we placed the order for the carpet to be cut and bound, but last week it was ready to be installed. 

 IMG_0152IMG_0155

We’re really happy with how it turned out.  It looks great and it definitely provides some extra grip on our stairs, making them safer.

Saturday, November 6, 2010

Putting on an Addition

After finishing most of our home renovations we thought it was time to put on an addition.  No, not an addition to our house… to our family.  We are expecting a baby boy in February!

Of course, with a baby on the way, our renovation priorities shifted and we’ve had to decide what projects need to be completed before he arrives.

Here is our current to-do list:

  • install a carpet runner on our stairs
  • paint and furnish the nursery
  • finish the main room in the basement, including:
          • ordering a built-in bookshelf/desk unit
          • paint
          • install subfloor, carpet and trim

With three months to go, we’ve got lots of work ahead of us.  Hopefully we’ll be ready in time to bring home our little man!

Sunday, October 17, 2010

The Completed Shed

We finished building our new backyard shed.  We primed the trim and installed the window and doors. 

Pictures 015 

Earlier this summer, before our interlock was laid, we ran wiring underground to the back corner of the yard so that we could have power in the shed.  Now it’s a perfect storage and work space!

Sunday, September 26, 2010

Building the Backyard Shed

When we tore down our garage, we knew we’d need to get some sort of shed to store tools and garden accessories.  However, since building the fence was the first priority, we were stuck with an ugly storage container for the summer.

IMG_2978 

We found an 8x12’ pre-fab shed at Lowes that would work perfectly in the back corner of our yard.  Unfortunately, it came in a million pieces (you can see the pile of shed pieces hiding under the blue tarp in the photo above!)

After seeing how much water pools in our backyard during heavy summer rains, we decided to pour a concrete pad as a base for the shed.IMG_2993

Last weekend, we finally got started building it.  Dave built all the walls and then got some help from our neighbours to put it all together (thanks Jim and Jose!)

IMG_2994IMG_2999IMG_3000  
Finally, we put on the roof and added shingles.

IMG_3002IMG_3007 
Next, we’ll paint the trim and install the window and doors.  Then, we’ll build the shelving inside the shed.  Soon, we’ll be able to finally get rid of our storage container!

Sunday, September 19, 2010

Porch Railing

When we last showed you our new front porch, all that was left to do was get a new railing.  After wandering through the neighbourhood and checking out the different styles of railings that people have, we decided to go with an aluminum railing.

While we had some issues with the quality of the installation, we were happy with the look of our new railing once things were corrected.

IMG_3004IMG_3006 

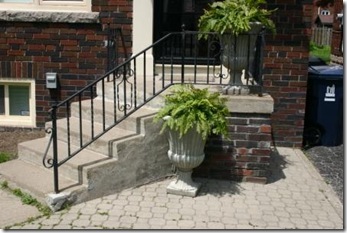
It’s definitely an improvement over the rusty old railing.  Here are the before and after:

IMG_4743IMG_3005

Wednesday, September 1, 2010

The Backyard Fence

Our new backyard fence is complete!  The fence runs down one side of the backyard, where the garage used to be. 

IMG_2973

As mentioned in a previous post, our official parking spot (which we will use as a patio) is located in our backyard.  Eventually, our deck will connect to the driveway end of the fence.  The patio is still a bit of a mess of supplies for future projects, including the shed that we plan to build in the back corner of the property.

 IMG_2975 IMG_2971

We built the fence out of cedar which was a mutual decision with our neighbour. At each step of assembly, to protect the wood, we finished it using Behr Cedar Natural Tone weatherproofing wood finish.  It was a very time consuming project, but we’re really happy with the result. 

Monday, July 19, 2010

Interlock and Asphalt

As part of this summer’s exterior work, we decided to get our driveway repaved at the same time we were getting our interlock laid in the backyard.

When we made the decision to get rid of our garage in the backyard, we decided to turn that area into a patio.  By laying interlock, the area will still meet the City’s zoning requirements for a parking space behind the house, but we’ll use the space as a patio.  Eventually, we plan to build a deck that will step down onto the patio.

 IMG_4885IMG_4886

Once the fence posts were installed, the contractors came and laid the interlock.  And then we finally got the new asphalt on the rest of the driveway.  Things are starting to look really good out there!

IMG_2967

Thursday, July 1, 2010

Fencing

While the workers were busy building our new porch in the front, we turned our attention to the backyard.  Once we tore the garage down, Dave and his friends installed the 6x6 cedar posts for our new fence.

IMG_4833 IMG_4832

The fence will run along the east side of our yard.  Since our “official” parking space will also be in our backyard, we decided that we will install a gate to fully enclose the backyard space.  Dave decided to dress it up a bit with a decorative piece across the top of the gate.  Finally, he stained the posts with a natural cedar-coloured stain.

IMG_4852

IMG_4841 IMG_4850IMG_4851 

Once the fence posts were completed, the paving company was ready to come and start prepping the backyard and driveway area for interlock and new asphalt.

Thanks to Chris, Rob, Stu, Shawn and Guy for all your help!

Thursday, June 24, 2010

The New Porch

We have a front porch again!  Once the porch was rebuilt with cinder blocks, it was finally time start making it look nice.

Inside the cold storage room, the walls were parged to leave a smooth surface.  Now it looks much cleaner and there isn’t anywhere for ants to live!  We also decided to get a window installed in the cold storage room, which will bring in some light and help us control the humidity during the summer.

IMG_4839

IMG_4894 IMG_4889 

Outside, we selected a faux stone to face the porch with.  We chose a greyish colour stone.

IMG_4845

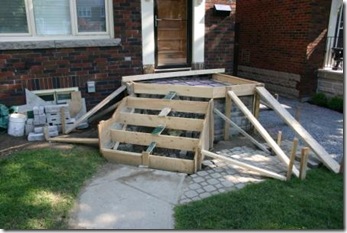
Once the stone was applied to the porch, the guys built the formwork for the concrete slab and stairs.  We decided to go with a bullnose on the stairs to dress it up a bit.

 IMG_4855IMG_4877 IMG_4875 IMG_4876 

Now all that’s left to do to finish the new porch is to choose and install a railing!

Blog Widget by LinkWithin